|
|||||||
|
||||||||
LandSerf running on Windows operating systems can display surfaces using a pseudo 3D perspective projection. Note that the 3d viewer requires larger amounts of memory to accommodate most surfaces. Typically, machines with less than 64Mb of RAM will perform poorly. For effective interactive performance a dedicated graphics card that supports 3D acceleration with OpenGL is strongly recommended.
To start the viewer, select 3D Surface Visualiser from the
Display menu (platforms that do not support this 3d viewer will have this menu item 'ghosted').
Initially, the current raster will be presented as a gridded surface with simple shadowing similar to the image shown below.
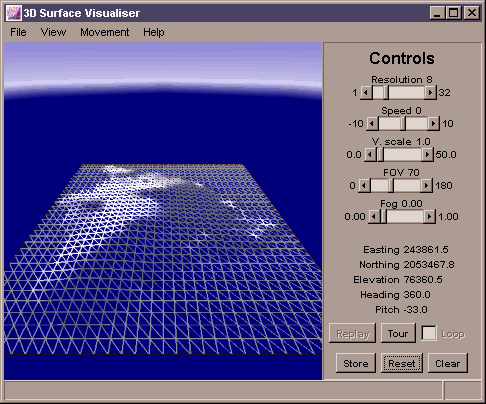 Opening view of 3D Surface Viewer.
The general representation of the surface is controlled from the View
menu. For example, the surface can be illuminated (to create a shaded relief effect),
the drape can be shown over the surface etc.
To change the viewing position, use the mouse to control the location of the 'camera'. Navigation in three dimensions takes a little while to get used to, but the general rule for moving the camera is to think of the camera as being set in the nose of an aeroplane pointing at the centre of the viewing window.
Holding the left mouse button down while dragging the mouse up and down controls the pitch of the aeroplane. Dragging the mouse left or right controls the horizontal tilt ('yaw') and roll of the aeroplane.
To move towards or away from the viewpoint at the centre of the screen, either drag with the right
mouse button up or down, or hold the a shift key down while dragging the left mouse button. Dragging
the mouse left or right in this way will move the camera left or right relative to your current view.
If you get lost at any stage, you can reset your position and viewing direction by pressing the
Reset button towards the bottom of the control panel.
When you have got used to these controls, the plane can be made to 'fly' by selecting the
Fly over surface option from the Movement
menu. The speed of the flight can be controlled either with the mouse or the Speed
slider control to the right of the view. The amount of rolling associated with an azimuthal
change in direction can be controlled from the Control Movement
menu.
As you navigate over a surface, it is possible to record the route you take. This can be stored and
later replayed. To store a route, navigate to an appropriate starting point and press the
Store button towards the bottom of the control panel. If you navigate
to a second position over the surface and press the button again, LandSerf will store the route between
the two points. Further points can be added to build up a complete route over the surface.
To 'play back' the route you have created, press the Replay button. The camera will be moved
from the first through each of the subsequent stored points to the last recorded location. If the
loop checkbox is set, the route will replay indefinitely. This is particularly
appropriate for circular routes where the first and last points in the route are at similar locations. The
speed of the replay can be controlled by Speed slider on the control panel. The playback
can be stopped at any time by pressing the Stop button and the route
can be cleared from memory by pressing the Clear Route button.
Routes can be saved and loaded to disk or exported/imported to/from a Virtual Field Course Hub, by selecting
the appropriate 'route' item from the File menu. If you do not wish to define or load your own
route, a default circular 'tour' around the currently displayed surface can be created by pressing the
Tour button in the control panel.
The resolution of the underlying triangular mesh can be controlled using the resolution
slider to the right of the view. Generally this should be set to quite a coarse value (e.g. 16
or above) while you are positioning the view, as a fine resolution slows down the rendering
considerably.
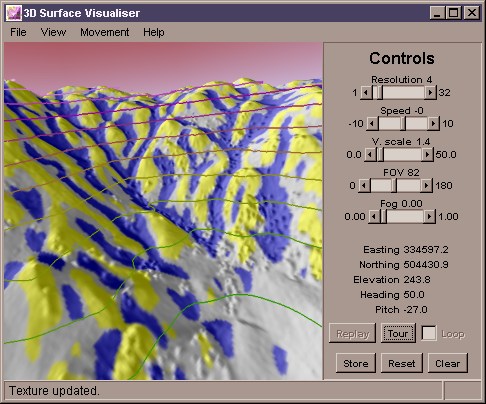 View of a feature drape with contours.
The raster to be draped over the surface is, by default, the image that was last displayed in
the main LandSerf window. Alternatively a graphics file (GIF or JPEG) can be loaded from
the File menu. The quality of the drape, from whatever source, is
controlled from the View menu. The drape quality should not normally be set beyond
the 'very high' level, which creates a textured surface of 1024x1024 pixels. Graphics cards with
large memories (64 megabytes or greater) can also show the maximum texture size of 2048x2048 pixels.
 Drape Update Window.
The image draped over the surface can be updated at any time by selecting the File -> Update Drape...
menu item. The resulting window allows you to replace the surface drape with the one currently
displayed in the main LandSerf graphics area by clicking one or more of the update
buttons. If your graphics card supports mipmapping, a different drape can be displayed according
to the distance between the 'camera' and surface. Larger resolutions correspond to closer views, smaller
resolutions to more distant views. This technique can be used to view multi-scale behaviour in a
dynamic 3d environment.
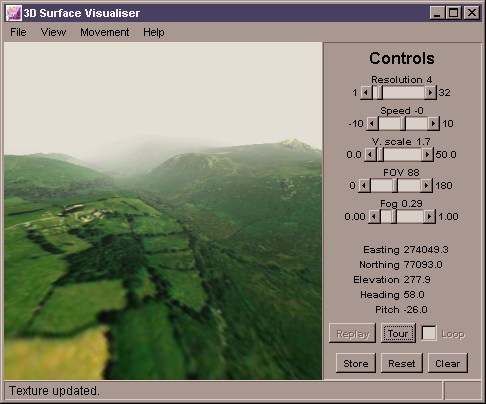 'Realistic' view with haze.
Several of the options on the control bar and menu are designed to allow a degree of realism to
be established in rendering the images. For example, the camera field of view can be controlled
using the slider. Wider fields of view taken with the camera close to the surface tend to imply
'immersion' in a large terrain, while narrow fields of view ('zoom lens') suggest a smaller model.
Further realism can be introduced by setting fog from the View
menu and controlling its density with the slider.
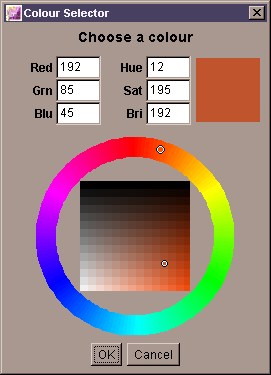 Colour chooser for sea, sky and haze.
By default all surface models are displayed with a background of 'sea' and 'sky'. These can be turned on or off
from the View -> Show sky menu. Sky blends from the its own colour to the haze colour at the horizon.
Sky, fog and sea colours can all be changed using the View -> Edit Colours... menu. New colours can
be created either by dragging the cursor over the colour chooser (as shown above), or by entering RGB or HSV values
directly. By changing the fog colour to orange, for example, a sunset effect can be produced at the horizon.
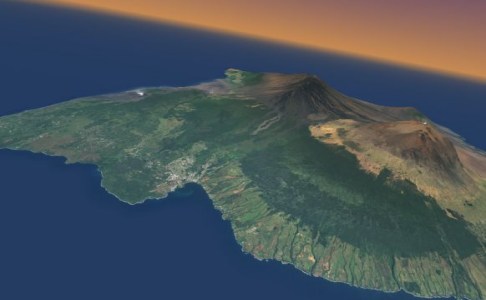 View over Hawaii with sunset
Note that due to a bug in the way OpenGL is handled on Windows 95/98, the only way to quit the 3d viewer on these platforms is to quit the main LandSerf window. If you wish to leave the 3d viewer without quitting LandSerf, minimise the 3d window. Other platforms (e.g. Windows NT/2000/XP) are not affected.
