Creating an Offset Constraint
| When defining an offset constraint between two components, you need to specify how
faces should be oriented. The offset value is always displayed next to the offset constraint. |
|
| The unit used is the unit displayed in the Units tab of the Tools -> Options dialog box. If you wish, you can customize it. | |
| The following table shows the elements you can select: |
| |
Point | Line | Plane | Planar Face |
|---|---|---|---|---|
| Point | |
|
|
|
| Line | ||||
| Plane | |
|
||
| Planar Face | |
| This task consists in applying an offset constraint between two faces. | |||||||||
| Before constraining the desired components, make sure it belongs to a component defined as active (the active component is blue-framed and underlined). | |||||||||
| Open the AssemblyConstraint02.CATProduct document. | |||||||||
| 1. | Click the Offset
Constraint icon This command is also available from the Insert menu. |
||||||||
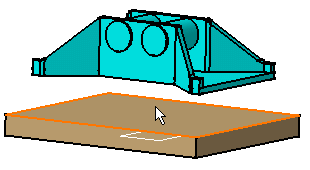
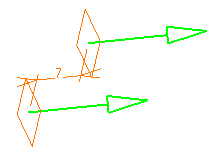
| 2. | Select the face to be constrained, that is the yellow face as shown. | ||||||||
|
|
|||||||||
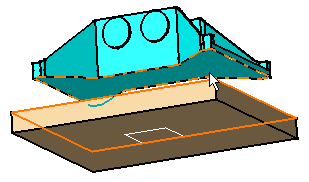
| 3. | Select the second face to be constrained, that is the blue face in the direction opposite to the yellow face. | ||||||||
|
|
|||||||||
| Green arrows appear on the selected faces, indicating the orientations. | |||||||||
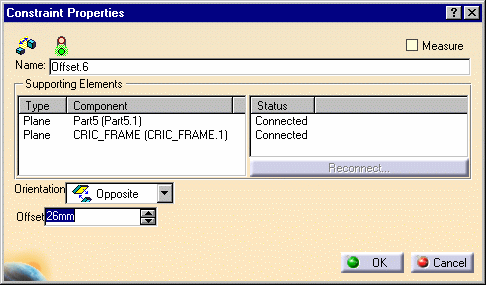
The Constraint Properties
dialog box that appears displays the properties of the constraint. The components
involved and their status are indicated. You can define the orientation of the faces to be
constrained by choosing one of these options:
Note that when changing a 'Same' orientation into an 'Opposite' orientation or vice-versa, the application may sometimes positions the parts in an unexpected way especially if your system is under-constrained. For the purposes of our scenario, keep the Opposite option. |
|||||||||
 |
|||||||||
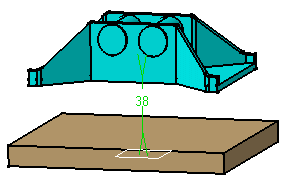
| 4. | Enter 38 mm in the Offset field. | ||||||||
| 5. | Click OK to create the offset constraint. | ||||||||
| A green arrow is
displayed in the geometry area to indicate that this constraint has been defined. The
offset value is displayed too.
This constraint is added to the specification tree too. |
|||||||||
|
|
|||||||||
|
Graphic symbols used for constraints can be customized. For more information, refer to Constraint Creation . | ||||||||
Positive and Negative Offsets |
|||||||||
| When setting an offset constraint, you can define positive or negative offset values. For this, remember that: | |||||||||
|
|||||||||
|
|||||||||
|
 |
||||||||
|
|||||||||
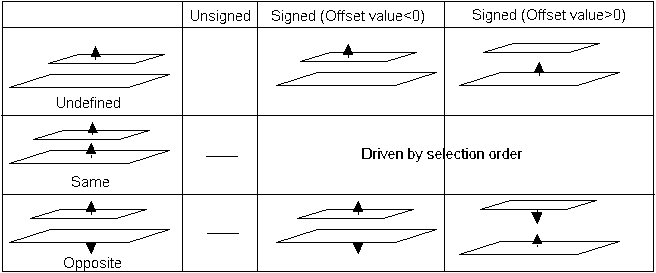 |
|||||||||