Creating a Breakout View
| This task will show you how to create a breakout view. In other words, you will remove locally material from a generated view in order to visualize the remaining visible internal part. A breakout view is one not in direct projection from the view containing the cutting profile. In other words, it is not positioned in agreement with the standard arrangement of views. A breakout view is often a partial section. | |||||||||||
| Before You Begin, make sure you customized the following settings:
Grid: In addition: Make sure the generated view is active. In this particular case, double-click the left view. |
|||||||||||
|
Open the GenDrafting_part.CATDrawing document.
|
|||||||||||
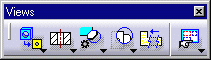
| 1. | Click the Drawing window, and click
the Breakout View icon |
 |
|||||||||

|
|||||||||||
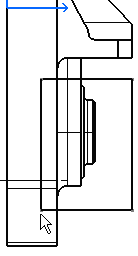
| 2. | Click the first point of the breakout profile. |
|
|||||||||
| Click as many points as desired for creating the profile. | |||||||||||
| 3. | |||||||||||
| 4.
|
If needed, double-click to end the profile creation and automatically close this profile. OR |
||||||||||
| 4. | Click on the profile first point to close and end the profile creation.
|
||||||||||
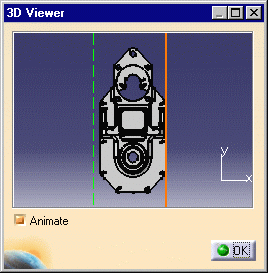
The 3D Viewer window appears and
presents the 3D part corresponding to the generated view. This window
allows:
|
|||||||||||
| 5. | Check the Animate option for visualizing the 3D part in accordance with the position of the cursor on a generated view. | ||||||||||
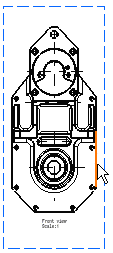
| 6. | In the CATDrawing document, go over the front view that is perpendicular to the left view. | ||||||||||
| 7. | In the CATDrawing document, go over
and then select the edge or circle to be used as one extremity plane.
The modified plane is orange until you select it on the generated view. |
||||||||||
 |
 |
||||||||||
| OR | |||||||||||
| 7. | In the 3D Viewer window, drag the plane that can be moved to the desired location. | 
|
|||||||||
| 8. | Click OK in the 3D Viewer window.
The breakout view is created. |
 |
|||||||||
| You can create a breakout view on a view that already contains breakout views. | |||||||||||
|
|||||||||||
You can generate the following types of views from a breakout view:
|
|||||||||||
|
|||||||||||
| Once the breakout view is created, you can right-click the
view, and select the Remove Breakout option. You can also right-click the view, select the Apply Breakout To option and click another view you want to apply the breakout to.
|
|||||||||||
| To generate views (projection, auxiliary,
section and section cut) with this breakout, go to Tools
-> Options -> Mechanical Design -> Drafting from the menu bar,
click on the Layout tab, and activate
the Propagation of broken and breakout specification option. Propagating a specification means generating a view (B) from another view (A) on which you previously performed an operation and including this operation in the generated view (B). For example, (i) you create a breakout view (view A) and activate the activate the Propagation of broken and breakout specification option, you then (ii) generate a projection view (view B). As a result, the projected view (view B) will display this breakout area.
|
|||||||||||
|
You can choose the line type you want to assign to the breakout view. To do this, go to Tools -> Options -> Mechanical Design -> Drafting , click on the Generation tab, click the Linetype switch button and select the desired line type from the Linetype for some views dialog box. | ||||||||||
|
|
|||||||||||