|
-
Open the KwrFormula0.CATPart document,
select the root item in the specification tree and access the Knowledge Advisor
workbench.
-
Click the Check icon  .
The first Check Editor dialog box is displayed. .
The first Check Editor dialog box is displayed.
-
Replace the default name with Cylinder_Check. If needed, add some
comments to the Description field.
If you want to add the check to be created to a specific relation set, specify a
destination. To do so, see Creating Sets of Relations. By
default, the check is created right below the Relations node.
-
Click OK. The Check Editor is displayed.
-
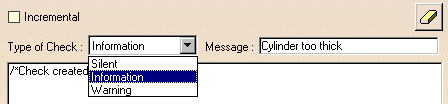
Select a type of check. Enter the message you want to be displayed in
the information or warning box in case the check is not verified.
-
Enter the check statements in the edition window. You can simply
Copy/Paste the following statements into the edition window: Relations\Formula.1\Activity == false
Click Apply to test your check syntax.
Click OK to add Cylinder_Check to the relations node in the specification
tree. A red icon is displayed in the specification tree meaning that the check is not
valid.
Deactivate
Formula.1, the check icon turns to green in the specification tree.
|