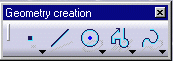
Using Tools
| You will find here below information on helpful
tools for creating any interactive elements. Multi-selection can also be very useful.
|
||||||||||||||||||||||||||
Tools ToolbarThe Tools toolbar displays both command options and given fields/values that appear in accordance with the command you select. This toolbar is situated at the bottom right of screen. If you cannot see it properly, just undock it.
|
||||||||||||||||||||||||||

|
||||||||||||||||||||||||||
| The Tools toolbar provides the following options:
Depending on the selected command, the Tools toolbar may also provide the following options:
The values of the elements you sketch appear in the Tools toolbar as you move the cursor. In other words, as you are moving the cursor, the Horizontal (H), Vertical (V), Length (L) and Angle (A) fields display the coordinates corresponding to the cursor position.
You can also use these fields for entering the values of your choice. In the following scenario, you are going to sketch a line by entering values in the appropriate fields.
|
||||||||||||||||||||||||||
| 1. Click the Line
|
||||||||||||||||||||||||||
| The Tools toolbar displays information on value
fields.
2. Enter the coordinates of the First Point and press enter. OR 3. Enter the length (L) of the line and press enter. |
||||||||||||||||||||||||||
| Depending on the number of fields available and
the way you customized your toolbar, some fields may be truncated. What you need to do is
just undock the Tools toolbars.
|
||||||||||||||||||||||||||
|
||||||||||||||||||||||||||
| The grid will help you draw geometry in given circumstances.
For example, the grid will make it easier to draw profiles requiring parallel lines.
|
||||||||||||||||||||||||||
|
||||||||||||||||||||||||||
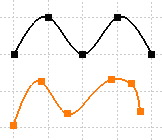
| If activated, this option makes your geometry begin or end on the points of the grid. As you are creating 2D geometry, points are forced to the intersection points of the grid. Note that this option is also available using Tools ->Options ->Drafting (General tab). | ||||||||||||||||||||||||||
| 1. Create a spline. In this example, the black spline was created with the Snap to Point option activated. The points are on the grid. Conversely, the highlighted spline was created with the option deactivated. |
||||||||||||||||||||||||||
| You can use autodetection even if this option is activated. | ||||||||||||||||||||||||||
| In the case of dimensions and annotations, even
though the Snap to Point option remains on (red-colored), you can
temporarily de-activate the functionality. For this, press the Shift
button while you move the dimension or annotation.
|
||||||||||||||||||||||||||
|
||||||||||||||||||||||||||
|
||||||||||||||||||||||||||
|
|
|||||||||||||||||||||||||
|
|
|||||||||||||||||||||||||
|
||||||||||||||||||||||||||
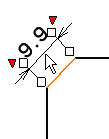
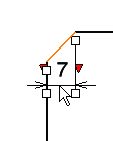
| Remember that as you create the dimension in one mode, you can use the contextual menu and select another mode. | ||||||||||||||||||||||||||
|
||||||||||||||||||||||||||
| You can differentiate 2D elements (Interactive workbench) from generated elements (Generative workbench) within the same view. This can prove very helpful when you need to add purely interactive elements onto generated views. | ||||||||||||||||||||||||||
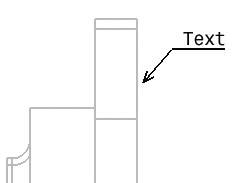
| Open the GenDrafting_part.CATDrawing document. Create a text with a leader on an active view. | ||||||||||||||||||||||||||
| 1. Click the Filter Generated Elements icon The generated elements appear in grey. 2. Create a 2D element. For example, create a text with leader. |
 |
|||||||||||||||||||||||||
| This command is active provided you installed Generative Drafting license. | ||||||||||||||||||||||||||
|
||||||||||||||||||||||||||
Make the Most of Multi-selection |
||||||||||||||||||||||||||
| When you need to create and/or modify an element, you can either select the element or the command first. Multi-selection can only be used for given commands. You are therefore allowed to select element(s) before these given commands. | ||||||||||||||||||||||||||
| Open the Brackets_views06.CATDrawing document. | ||||||||||||||||||||||||||
| 1. Multi-select 2D elements. For example, four circles. | 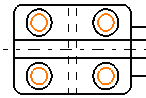 |
|||||||||||||||||||||||||
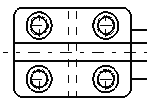
| 2. Click the desired command. For
example, the Threads icon Four threads are automatically applied to the selected circles. |
 |
|||||||||||||||||||||||||
|
||||||||||||||||||||||||||