Creating Sliders

Sliders are prismatic join restraints applied to handle points of virtual parts, which result in constraining the point to slide along a given axis. They can be viewed as particular cases of general prismatic joins, which allow a relative translation between two points (in the Slider case, one of the two points is fixed, along with the sliding axis).


means that there is no translation degree of freedom left in that direction.
means that there is no rotation degree of freedom left in the direction.

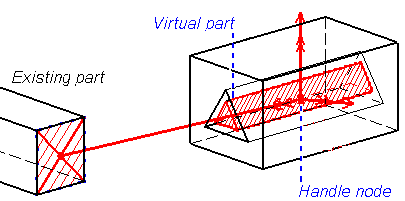
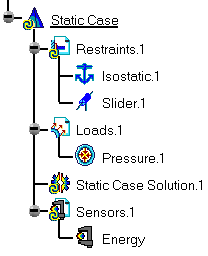
Slider objects belong to Restraint objects sets.

For the fixed point, the program automatically picks the handle of the virtual part. The user defines the sliding direction, and as a result the virtual part as a whole is allowed to slide along an axis parallel to the sliding direction and passing through the fixed point.

Make sure you fixed all the global degrees of freedom of your assembly, otherwise a global singularity will be detected at the time of the Static Computation (such a model is unsolvable). To allow you to easily correct the model (Static Analysis Cases only), the singular displacement of the assembly will be simulated and visualized after computation.

When connected to deformable bodies, the virtual part will transmit the effect of the Slider restraint collectively to the entire connected geometry. 


Sliders can be applied to the following types of Supports:
Mechanical Feature

 Geometrical Feature

Analysis Feature
Point or Vertex Curve or Edge Surface or Face Volume or Part

Virtual part

This task shows how to create a Slider on a virtual part.


You can use the sample15.CATAnalysis document from the samples directory for this task.

Before You Begin:
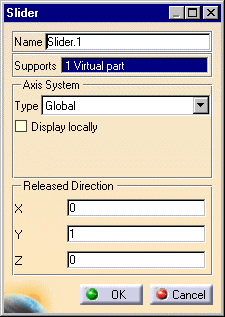
Go to View -> Render Style -> Customize View and make sure the Shading, Outlines and Materials options are active in the Custom View Modes dialog box.


1. Click the Slider icon .
The Slider dialog box is displayed.

2. You can change the identifier of the Slider by editing the Name field, if needed.

The Axis Type combo box allows you to choose between Global and User-defined Axis systems for entering components of the sliding axis. 
Global: if you select the Global Axis system, the components of the sliding direction will be interpreted as relative to the fixed global rectangular coordinate system.   
User-defined:  if you select a User-defined Axis system, the components of the sliding direction will be interpreted as relative to the specified rectangular coordinate system.  

To select a User-defined Axis system, you must activate an existing Axis by clicking it in the features tree. Its name will then be automatically displayed in the Current Axis field.        

3. Set the Axis system.

4. In the X, Y, Z fields, enter the values corresponding to the components of the sliding direction relative to the selected Axis System.

You can define the sliding direction by using the compass. The values in the X, Y, Z fields correspond to the direction components of the compass principal axis.
You can modify the compass orientation either with the mouse or by editing the compass.  
By applying the compass to any part geometry, you can align the compass directions with the implicit axis directions of that geometry: drag the compass by handling the red square and drop it on the appropriate surface. The normal direction to this surface defines the new direction. Then, click on the Compass Direction button to take this new direction into account. You can now invert the direction if desired, by editing the values of the three components. 


5. Select the virtual part.

A symbol representing the sliding direction is displayed on the virtual part.

6. Modify the sliding direction orientation.
The visualized Slider symbol orientation is automatically updated to reflect the modifications of the compass principal direction.

7. Click OK in the Slider dialog box to create the Slider.
A Slider object appears in the specification tree under the active Restraints objects set.

 
ainfo.gif (980 bytes)

You can either select the virtual part support and then set the Slider specifications, or set the Slider specifications and then select the virtual part support.

If several Analysis Cases have been defined in the Finite Element Model, you must activate a Restraints objects set by clicking it in the features tree before creating a Slider object (only available if you have ELFINI Structural Analysis product installed).
Restraints are required for Stress Analysis computations. They are optional for Modal Analysis computations (if not created, the program will compute vibration modes for the free, unrestrained part).
Slider objects can be edited by a double click on the corresponding object or icon in the features tree.


ainfo.gif (980 bytes) Make sure the computation is finished before starting any of the following operations.
 

awarning.gif (1007 bytes)


  Products Available in Analysis Workbench

  on a Slider object:
Restraint visualization on mesh: the translation of your Slider object specifications into solver specifications can be visualized symbolically at the impacted mesh nodes, provided the mesh has been previously generated via a Compute action.
  on a Restraints objects set:
Generate Image: generates an image of the computed Restraint objects (along with translating all user-defined Restraints specs into explicit solver commands on mesh entities), by generating symbols for the nodal restraints imposed by the Restraints objects set. The image can be edited to include part or all of the options available.
Report: the partial status and results of intermediate  pre-processor computations are reported in HTML format. It represents a subset of the global Report capability and generates a partial report of the Restraints objects set Computation. 

See Creating Clamps for more details.


Back Up Next