Images Layout
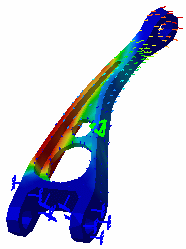
Generated images corresponding to analysis results are superimposed into one image that cannot be properly visualized. You can tile these superimposed images into as many layout images on the 3D view.
|
|||||||
| This task shows how to tile layout images.
|
|||||||
You can use the sample13.CATAnalysis document from the samples directory for this task. Before You Begin: Right-click, one after the other, on the Stress Von Mises and then on the Translational displacement vector images in the specification tree and select the Activate/Deactivate option from the displayed contextual menu. In other words, you will make sure that at least one image was created and activated on the part.
|
|||||||
|
1. Click the Image Layout icon The Images Layout dialog box appears.
2. Select the axis along which you will tile the images, in the Images Layout dialog box. 3. Click OK in the Images Layout dialog box. The images are tiled along the Y axis.
|
||||||
|
|||||||
|
|
|||||||
 This capability is only available
with the ELFINI Structural Analysis product.
This capability is only available
with the ELFINI Structural Analysis product.