Groove
| Grooves are revolved features that remove material from existing features. This task shows you how to create a groove, that is how to revolve a profile about an axis (or construction line). | |||||
| You can use wireframe geometry as your profile and axes created with the Local Axis capability. | |||||
| Open the Revolution.CATPart document. | |||||
| 1. | Click the Groove icon |
||||
| 2. |
Select the profile. The Groove Definition dialog box is displayed |
||||
|
|
|||||
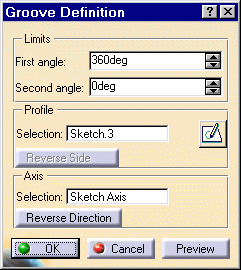
The application displays the name of the selected sketch in the Selection field from the Profile frame. The Selection field in the Axis frame is reserved for the axes you explicitly select. For the purposes of our scenario, the profile and the axis belong to the same sketch. Consequently, you do not have to select the axis. |
|||||
The system previews a groove entirely revolving about the axis. |
 |
||||
About Profiles
|
|||||
|
|||||
|
|||||
|
|||||
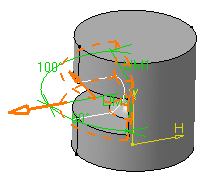
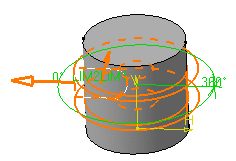
| 3. | The application previews the limits LIM1 and LIM2 of the groove to be created. |
||||
| You can select these limits and drag them onto the desired value or enter angle values in the appropriate fields. For our scenario, select LIM1 and drag it onto 100, then enter 60 in the Second angle field. | |||||
| 4. |
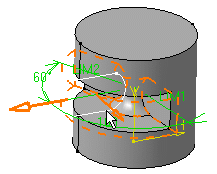
Optionally click Preview to see the
result. Just a portion of material is going to be removed now. |
|
|||
| 5. | Click the Reverse
Direction button to inverse the revolution direction, or use the Reverse
direction contextual command available from the arrow.
As an alternative, click the arrow to obtain the direction as shown: |
||||
|
|
|||||
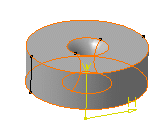
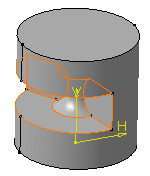
| 6. | Click OK to confirm the operation. CATIA removes material around the cylinder. The specification tree indicates the groove has been created. This is your groove: |
 |
|||
| 6. | The option Reverse
Side lets
you choose between creating material between the axis and the profile,
which is the default direction, or
between the profile and existing material. You can apply this option to open or closed profiles.
Double-click the groove to edit it. Now, you are going to remove the material surrounding the profile. |
||||
| 7. | Click the Reverse Side button or alternatively click the arrow in the geometry. | ||||
| 8. | Enter 360 as the first angle value and 0 as the second angle value. The application previews the new groove. | ||||
| 9. | Click OK to confirm.
The material surrounding the profile has been removed. |
||||
|
|
|||||
|
|
|||||