Creating a Clipping View and/or a Clipping View Profile
This task will show you how to create both a clipping view using a circle as callout. You can also use a roughly sketched profile. A clipping view is a partial view that shows only what is necessary in the clear description of the object. This operation is applied directly onto the active view. |
| Before You Begin, make sure you customized the following settings:
Grid: View names and scaling factors:
|
| Open the GenDrafting_clipping_view.CATDrawing
document.
|
|||
| 1. | Click the Drawing window, and click the Clipping View icon If you create a clipping view using a sketched profile, you will select the Clipping Profile View icon
|
 |
|

|
|||
USING A CIRCLE
|
|||
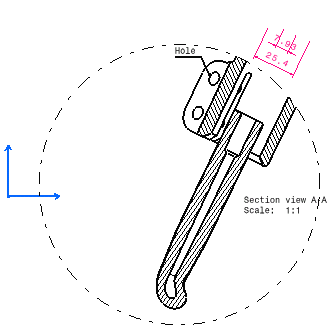
| 2. | Select the center of the circle or select the required
points for sketching a polygon, for example (see on the right column).
|
||
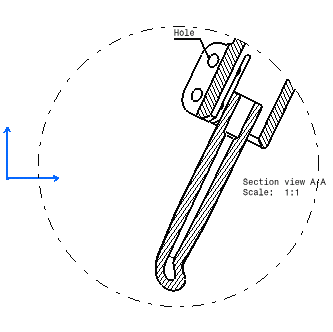
| 3. |
In the case of a polygon, double-click to end the cutting profile creation. The clipping view and associated profile result as shown here:
|
||
 |
|||
| Note that the generated dimensions that are not in the
clipping view and annotations that are no
more linked to the generated clipping view are automatically turned into
the NoShow mode.
|
|||
| 4. | Click the Swap visible space icon 
You can now visualize the dimensions and annotations that appear no more on the clipping view and, if needed, make them appear again on the clipping view.
|
||
|
Be careful: you can select the Unclip option from the dialog
box. BUT, in no way this option will allow you making re-appear the
dimensions on the unclipped view.
|
||
| 5.
6. |
Click the Hide/Show icon Select the dimension you want to appear on the clipping view.
|
||
|
7. |
Click the Swap visible space icon The selected dimension now appears on the clipping view again.
|
||
| You can insert Bill of Material information into the active view. | |||
|
|
|||