Creating a Holes Dimensions Table
| This task will show you
how to create a Holes and Center Lines Dimensions Table (containing diameter and center
coordinates).
|
||||||||||
| Open the alesage.CATDrawing document. | ||||||||||
|
1. Select one or more holes and center lines (only center lines not associated with a hole) in the drawing.
2. Click the Hole
Dimension Table icon
|
||||||||||
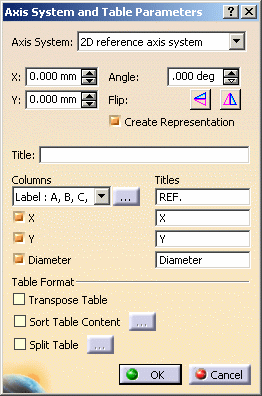
| 3. The Axis System and
Table Parameters dialog box is displayed.
Axis system: You can rotate or flip the axis using the Flip horizontally and Flip vertically icons and choose to represent the axis system by checking the Create representation box. |
 |
|||||||||
| Title: Type the table title.
Columns:
Table format:
|
||||||||||
|
||||||||||
4. Choose 2D reference axis system for the axis system from the associated drop-down list. 5. Type the table name in the Title field. 6. Select Label: A, B, C from the Column drop-down list (you can also choose the Index naming mode) to give a label to the selected points in the drawing. |
||||||||||
| 7. Check X, Y and Diameter to have four columns corresponding to the hole labels and to the Cartesian coordinates. Then enter a title for each column. |  |
|||||||||
8. Check Transpose table to invert columns and rows in the table. |
||||||||||
| 9. Check
Sort table
content and then click the
icon 10. To sort the table by descending X coordinates, choose X in the Sort by combo box, and select Descending. Then, click Close. |
 |
|||||||||
| 11. Click OK to validate your settings and then click in the drawing to define the location of the table. The table is generated. | ||||||||||
|
|
||||||||||
|
||||||||||


