Basic Draft
| Drafts are defined on molded parts to make them easier to remove from molds. | |||||||
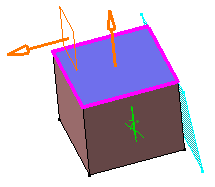
| The characteristic elements are: | |||||||
|
|||||||
|
|||||||
|
|||||||
|
|||||||
| There are two ways of determining the
objects to draft. Either by explicitly selecting the object or by selecting the neutral
element, which makes CATIA detect the appropriate faces to use. This task shows you how to create a basic draft by selecting the neutral element. |
|||||||
| Open the Draft2.CATPart document. | |||||||
| 1. | Click the Draft Angle icon |
||||||
|
|
|||||||
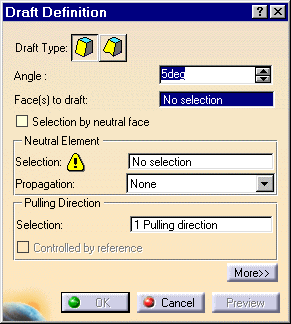
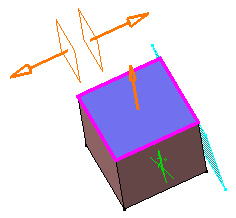
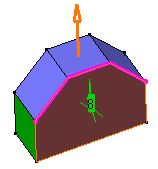
| The Draft Definition dialog box is displayed and an arrow appears on a plane, indicating the default pulling direction. | |||||||
| This dialog box displays the constant angle draft option as activated. If you click the icon to the right, you then access the command for creating variable angle drafts. | |||||||
 |
|||||||
| 2. | Check the Selection by neutral face option to determine the selection mode. | ||||||
| 3. | Select the upper face as the neutral element. This selection allows CATIA to detect the face to be drafted. The neutral element is now displayed in blue, the neutral curve is in pink. The faces to be drafted are in dark red. The Propagation option can be set to:
For more about the neutral element, refer to A Few Notes about Drafts. |
||||||
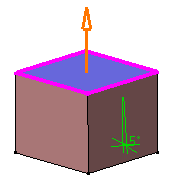
| The pulling direction is now
displayed on top of the part. It is normal to the neutral face.
The Controlled by reference option is now activated, meaning that whenever you will edit the element defining the pulling direction, you will modify the draft accordingly. |
|||||||
 |
|||||||
| Note that when using the other selection mode (explicit selection), the selected objects are displayed in dark pink. | |||||||
| 4. | The default angle value is 5. Enter
7 degrees as the new angle value. The application displays the new angle value in the geometry. |
||||||
| 5. | Click Preview to see the draft to be created. It appears in blue. | ||||||
|
|
|||||||
| 6. | Click the More button to access
additional options.
To know how to use the options "Parting Element" and "Draft Form", refer to Draft with Parting Element. |
||||||
| 7. | Click the Limiting element(s) field. While drafting a face, you can limit it by selecting one or more faces or planes that intersect it completely. | ||||||
| 8. | Select Plane.1 as the limiting element.
The arrow points to the portion of material to be kept to perform the operation. |
 |
|||||
| 9. | Select Plane.2 as the
second limiting element.
Note that the number of limiting elements you select is indicated in the dialog box, just in front of the Limiting Elements field. |
||||||
| 10. | Click the arrow to reverse its direction, and therefore retain the opposite side of the feature. | ||||||
|
|
|||||||
| When using several limiting elements, make sure that they do not intersect on the face to be drafted. | |||||||
| 11. | Click OK to confirm the operation. The faces are drafted but the part areas included between both limiting planes have not been modified, as specified through the limiting element option. |
||||||
 |
|||||||

A Few Notes about Drafts
Editing Drafts |
||||
|
|
If you edit the sketch used for defining the initial pad, CATIA integrates this modification and computes the draft again. In the following example, a chamfer was added to the profile. | 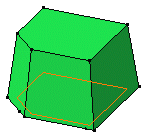 |
||
|
|
You can now transform a constant angle draft into a variable angle draft. To do so, double-click your draft, then click the variable angle draft option in the dialog box to access the appropriate options. For more, refer to Variable Angle Draft. | |||
Neutral Elements |
||||
|
|
It is possible to select several faces to define the neutral element. By default, the pulling direction is given by the first face you select. This is an example of what you can get: |
|||
 |
|
|||
| Draft Definition | Result | |||
|
|
You can use neutral elements that do not intersect the faces to be drafted. This is an example of what you can get: | |||
|
|
|
|||
| Draft Definition | Result | |||
Methodology |
||||
|
|
If you need to draft several faces
using a pulling direction normal to the neutral element, keep in mind the following
operating mode that will facilitate your design: Click Now, to create the other drafts in the same CATPart document, note that by default the application uses the same pulling direction as the one specified for creating your first draft. As designers usually use a unique pulling direction, you do not need to redefine your pulling direction. |
|||
|
|
If you perform a difficult drafting, for example if you obtain twisted faces, use the Deactivate and Extract Geometry commands to solve your difficulties. For more information, refer to Extracting Geometry. | |||
|
||||