Rectangular Pattern
| You may need to duplicate the whole geometry of one or more features and to position this geometry on a part. Patterns let you do so. |
| CATIA allows you to define three types of patterns: rectangular, circular and user patterns. These features accelerate the creation process. |
| This task shows you how to duplicate the geometry of one pocket right away at the location of your choice using a rectangular pattern. Then, you will learn how to modify the location of the initial feature. | ||||||||
| Open the RectangularPattern1.CATPart document. | ||||||||
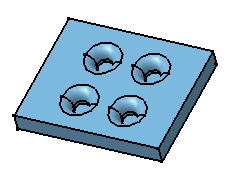
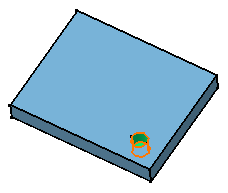
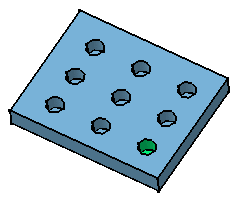
| 1. | Select the feature you wish to copy, that is the pocket as shown: | |||||||
|
|
||||||||
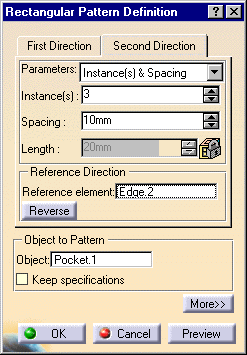
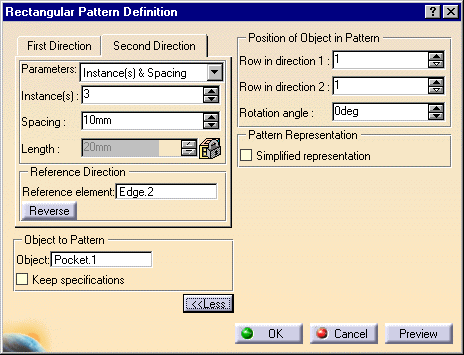
| 2. |
Click the Rectangular Pattern
icon The Rectangular Pattern Definition dialog box that appears displays the name of the geometry to pattern. |
|||||||
|
||||||||
|
|
||||||||
|
||||||||
|
Each tab is dedicated to a direction you will use to define the location of the duplicated feature. In this task, you will first set your specifications for the first direction. |
||||||||
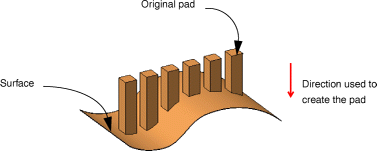
| Checking the Keep specifications option creates instances with the limit Up to Next ( Up to Last, Up to Plane or Up to Surface) defined for the original feature. In the example below, the limit defined for the pad, i.e. the "Up to surface" limit, applies to all instances. As the limiting surface is not planar, the instances have different lengths. | ||||||||
 |
||||||||
But for the purposes of our scenario, as the pocket's height is specified, activating the Keep specifications option is meaningless. |
||||||||
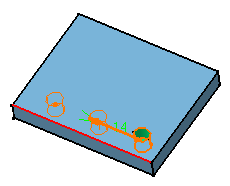
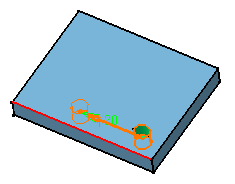
| 3. |
Click the Reference element field and select the edge as shown below to specify the first direction of creation. |
|||||||
|
||||||||
| An arrow is displayed on the pad. If needed, check the Reverse button or click the arrow to modify the direction. | ||||||||
|
To define a direction, you may select an edge or a planar face. | |||||||
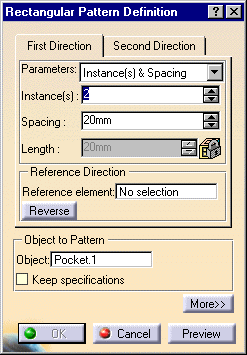
| 4. | Let the Instances & Spacing
options to define the parameters you wish to specify. The parameters you can choose are:
Choosing Instances & Spacing dims the Length field because the application no longer needs this specification to space the instances. |
|||||||
| If you set Instances & Length or Spacing & Length parameters, note that you cannot define the length by using formulas. | ||||||||
| 5. | Enter 3 as the number of instances you wish to obtain in the first direction. | |||||||
|
Deleting the instances of your choice is possible when creating the pattern. In the pattern preview, just select the points materializing instances. Conversely, selecting these points again will make CATIA create the corresponding instances. | |||||||
| 6. | Define the spacing along the grid: enter 14 mm. | |||||||
 |
||||||||
| Defining the spacing along the grid and length of your choice would make the application compute the number of possible instances and space them at equal distances. | ||||||||
| 7. | Now, click the Second Direction tab to define other
parameters. Note that defining a second direction is not compulsory. Creating a rectangular defining only one direction is possible. |
|||||||
| 8. | Click the Reference element field and select the edge to the left to define the second direction. | |||||||
| 9. | Check the Reverse option to make the arrow point in the opposite direction. | |||||||
| 10. | Let the Instances & Spacing option: enter 3 and 10 mm in the appropriate fields. | |||||||
 |
||||||||
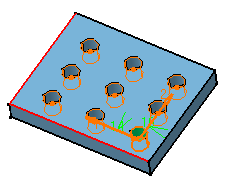
| 11. | Click Preview to make sure the pattern
meets your needs. Additional pockets will be aligned along this second direction. |
|||||||
|
|
||||||||
| 12. | Click OK to repeat the pocket's geometry nine times. This
is the resulting pattern. The feature "RectPattern.1" is displayed
in the specification tree. |
|||||||
|
|
||||||||
| 13. | Let's now edit the pattern to make it more complex: double-click the pattern to display the dialog box. | |||||||
| 14. | Click the More button to
display the whole dialog box. The options available makes it possible to position the pattern. |
|||||||
 |
||||||||
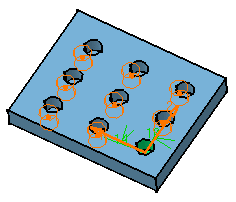
| 15. | To modify the position of the pockets, enter -5 degrees as the rotation angle value. | |||||||
| 16. | Click Preview. You will notice that all pockets have moved slightly: |
|||||||
|
|
||||||||
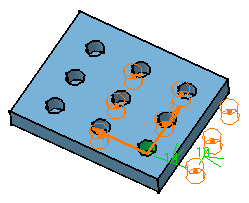
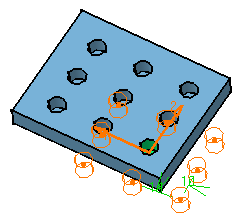
| 17. | Now, modify the location of the initial pocket.
To do so, enter 2 in the Row in Direction 1 field. The application previews how the pattern will be moved. It will be moved along the direction as indicated: |
|||||||
|
|
||||||||
| 18. | Finally, enter 2 in the Row in Direction 2 field. The application
previews how the pattern will be moved. It will be moved along these two directions
defined in steps 17 and 18: |
|||||||
|
|
||||||||
| The option "Simplified representation" lightens the pattern's geometry. What you need to do is just check the option and double-click the instances you do not want to see. The instances are then represented in dashed lines during the pattern definition and then are no longer visible after validating the pattern creation. The specifications remain unchanged, whatever the number of instances you view. This option is particularly used for patterns including a large number of instances. | ||||||||
| Remember that clicking an instance once removes the instance from the specifications. Clicking once or double-clicking an instance does not lead to the same result then. | ||||||||
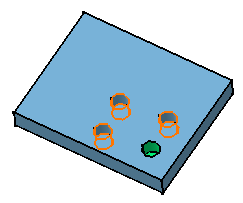
| 19. | Click OK. The application has changed the location of all pockets. Only four of them remain on the pad. |
|||||||
|
|
||||||||
| CATIA Version 5 provides the capability of creating Cartesian patterns with variable steps. To do so, define formulas. More explicitly, act on parameters i and j. For more information, refer to CATIA- Knowledge Advisor User's Guide Version 5. | ||||||||
| During your design, you may need to rework instances specifically. You will then have to use the Explode contextual command to delete your pattern while keeping geometry. For more information, refer to Exploding Patterns. | ||||||||
Complex Patterns |
|||||||||
| You can pattern a list of Part Design features by proceeding as follows: | |||||||||
| 1. | Multi-select the features to be duplicated.
These features must belong to the same body. |
||||||||
| 2. | Click the Rectangular Pattern icon The features are indicated in the Object field. |
 |
|||||||
| 3. | Set the parameters you need as shown in the task above. | ||||||||
These rules are to be kept in mind before
patterning a list of features.
|
|||||||||
|
|
|||||||||
| Editing a List of Features
Editing a list of features consists in adding or removing features from the list. To do so, you just have to click the Object field and select the feature of interest to add it or remove it from the list. Note however that adding a feature to a pattern is possible only if your pattern is already based on a feature list. In other words, you cannot add any feature to a basic pattern created using a single feature. |
|||||||||
Patterning Current Solids |
|||||||||
| A current solid is composed of one or more features belonging to the same body. It is the result of the operations as mentioned in the specification tree, the last operation being the current one. For more about current features, see Scanning a part and defining local objects. | |||||||||
| To pattern a current solid, just
click the Rectangular Pattern
icon Note that if you change your mind and decide to pattern a feature, you just have to click the object field and select the feature of your choice. In the following example, the current solid is the result of one pad and one hole. |
|||||||||
 |
|||||||||
| The instances created via the Pattern command are composed of pads and holes only. | |||||||||
| You cannot transform a patterned list of features into a patterned current solid and vice-versa. | |||||||||