Chapter 12 Local and global variables and debugging techniques
12.1 Local and global variables
In lectures we discussed the difference between local and global variables. Here we will give an example to illustrate these points. Recall that a local variable is defined in a subroutine or function; such a variable can only be used or altered by that particular procedure. By contrast a global variable is defined at the start of the module, and can be used by all of the following procedures.
A very basic example of the difference between local and global
variables can be found below. This consists of
two versions of the same function, called calculate and
recalculate. Each calls another function (called secondary and
tertiary respectively); the only difference is the nature of the
variable called test or test2.
Dim test As Integer

Function calculate() As Integer
test = 3
calculate = secondary
End Function

Function secondary() As Integer
test = test + 5
secondary = test
End Function

Function recalculate() As Integer
Dim test2 As Integer
test2 = 3
recalculate = tertiary
End Function

Function tertiary() As Integer
Dim test2 As Integer
test2 = test2 + 5
tertiary = test2
End Function
At the tstart of our code we see the global variable
example. Here we define test as a global variable, and so
it is usable by all functions that follow. In the function
calculate we set test = 3 and then use the
secondary function. This adds 5 to test, and
then returns the value of test. Thus the final result of
running calculate will be the value 8, as we have added 5
to 3.
The rest of our code illustrates the same idea but
with test replaced by the local variable
test2. Now the function recalculate sets
test2 = 3 as before, and then calls
tertiary. However, as test2 was a local variable, it
does not exist in any procedure apart from the one it is defined. Thus
in tertiary the variable test2 does not exist
yet, and must be defined. The line test2 = test2 + 5 is
equivalent to setting test2 = 5, as the variable is not yet
defined and so starts life equalling \(0\). This means that the final
result of running recalculate will be the value 5. This is
different from the value obtained when we used global variables
above.
Notice also that in the second part of the example there was nothing
wrong with using the same variable name in several different functions
to mean different things. This was because they were all local
variables, and so did not transfer from one function to another. On
the other hand, we could not use test as our variable in
this part as it was already defined to be a global variable. If we had
attempted to use a Dim statement to define it again we would have
encountered an error message.
12.2 Debugging tools
In lectures we discussed some basic techniques for checking your code, by testing subroutines in isolation and using comments to temporarily prevent parts of your code from running. However, sometimes more sophisticated tools can be needed. The methods in this section are not necessary for the writing of working code, but you may find them useful with more complicated errors.
Sometimes it would be nice to be able to stop your program as it runs and check on the value of some of the variables. Ideally, you might even want to be able to follow your program as it progresses line by line, and track the effects that it has on the value of various variables. Both of these can be done using break points.
There are various ways to insert a break point into your code. First you chose the line of code where you wish the program to halt. Then either
- Position the cursor next to that line, right-click, and choose
ToggleandBreakpointfrom the menu. - Select the statement and then use the
DebugandToggle breakpointcommand. - Select the desired statement and press
F9. - Click in the margin to the left of the desired statement.
Whichever method you use, VBA will highlight the chosen line and add a
dot next to the line in the margin. Now when the code runs, VBA will
stop immediately before the highlighted line and enter Break mode.
Eventually you will need to remove your break point. To do this,
either click on the dot next to the line in the margin, or press F9.
Before explaining what Break mode does, here is another method for
accessing it. You can add the command Stop in your code
on the line immediately preceding the line where you wish to enter
Break mode, and this will have the same effect as adding a Break point
as above.
There are various things that you can do in Break mode. Most of these
involve the Immediate window, so we first need to ensure that this is
open. You may recall that in Section 5.2 we discussed the basic structure
of the Visual Basic Editor, and the various windows which it
contains. One of these was the Immediate window, and you may well have
chosen to close this window. If you wish to use it for debugging your
code you can reopen it using the View menu.
The Immediate window is used to issue commands and display current values of variables. While in Break mode you can step through your code one line at a time (rather like you were running the code in ultra-slow motion). This is done by pressing F8 each time you wish to execute the next line. As you do this, the current line will be highlighted in yellow. An example can be found in Figure 12.1. The main reason for doing this is to check the status of your variables in the Immediate window.
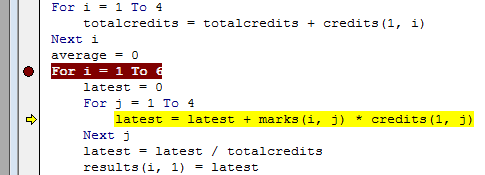
Figure 12.1: Stepping through your code in break mode
If you enter Print VariableName or just
? VariableName (where VariableName is the name of
one of your
variables) in the Immediate window, then it will display the current
value of that variable. Thus the Immediate window can be used to check
that your variables are behaving as you expect them to. In the example
above we could use the Immediate window as shown in Figure 12.2.
As well as viewing the current value of a variable, the Immediate
window can also be used to enter commands. For example, you may wish
to set some variable to be equal to a certain value, so that you can
check that the code behaves correctly.
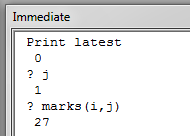
Figure 12.2: Checking variable values during break mode
There are other ways to view the value of a variable without entering
Break mode. One way is to use a MessageBox, which will be discussed
later in the module. Another is to use the Debug.Print command. Entering
Debug.Print Variable1, Variable2, Variable3
into your program will cause the current values of the variables called
Variable1 up to Variable3 to be displayed in the Immediate
window. The code will not stop running at that point, so you will need
to pay attention to the Immediate window while this is taking place.
Another useful window for debugging code is the Watch window. A
Watch is
used to enter Break mode when a certain condition is satisfied. For
example, you may wish to know what happens when one of your variables
equals 100, as you know that the code does not work for that value. To
do this you use Debug and Add Watch from the editor
ribbon to enter a new watch condition. An example of this is shown in
Figure 12.3.
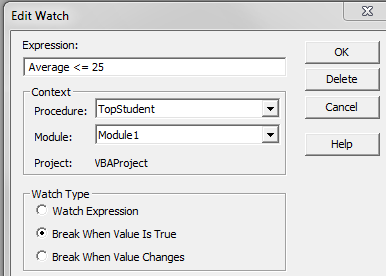
Figure 12.3: Entering a watch condition
In the expression box you enter the condition which must be satisfied to cause a break. In the context section you chose which procedures and/or modules should be watched. Finally, in the watch type section you chose what should happen when the condition is met. The Watch window displays the watches which have currently been defined.
The final window you may find useful when debugging is the Locals
window. When in Break mode, this
window lists all of the local
variables in the current procedure, together with their values. If the
variable is an array, then it is displayed as a nested structure, as
shown for the array called credits in Figure .
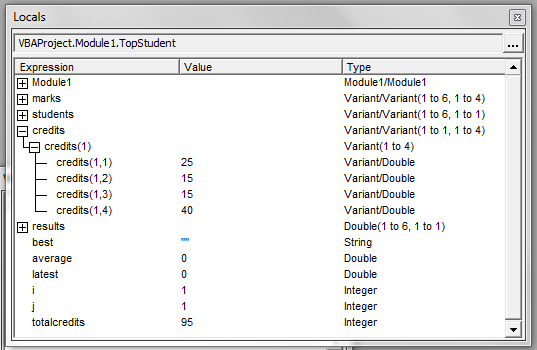
Figure 12.4: Using the locals window