Chapter 10 Macros
Macros are a very important feature in VBA, and so it provides a variety of ways of writing, accessing, and running them. We will review some of the most commonly used procedures.
10.1 Running a Macro
The basic macro commands are accessible on the Ribbon from both the Developer and View tabs. On the Developer tab the initial section (shown in Figure 10.1 provides the most commonly used commands as a series of clickable icons.
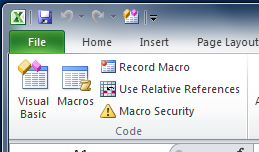
Figure 10.1: The Macro commands in the Developer tab
The same commands are also available from the View tab as a drop-down menu accessed from the Macro icon (shown in Figure 10.2 at the far right). As usual, you can also add the View Macro and Record Macro icons to the quick access toolbar by right-clicking and choosing the relevant option.

Figure 10.2: The Macro commands in the View tab
There are various ways to run a macro. The first, and simplest, is to click on the Macros icon and view the list of macros. This will appear in the Macros window, shown in Figure . From this window you can select the desired macro and run it using the Run button. It is also possible to edit the macro via this window and to assign it to a shortcut key via the Options button.

Figure 10.3: The Macros window
Once a macro has been associated with a shortcut key (in the form
Ctrl+keyname), we can use this as the second way to run
our macro, via this key combination.
The third way of running a macro is one that can also be used for
functions, where the macro name is referred to in another macro or
function. However, to use a macro called MacroName
inside another function or macro, we have to use the command
Call Macroname.
Macros can also call themselves recursively,
as illustrated (for functions) in Section 9.3.
It is convenient to be able to run a macro directly from the Visual Basic Editor, so that you can test it while you are writing your code. At the top of the Editor window there is a run menu, and below it three icons: play, pause and stop (see Figure 10.4). Pressing play will open whichever macro the cursor is currently positioned in. Just as with functions, you can stop a macro by clicking on the stop icon.
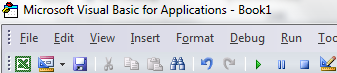
Figure 10.4: Running and stopping a macro
The final method of running a macro that we will consider here is particularly useful if you are designing code that is to be run by a different user. It is possible to add a button or other object to your spreadsheet, so that the user can run your macro simply by clicking on the button.
To add a button to the spreadsheet go to the Developer tab in the Ribbon and select the Insert menu (see Figure 10.5). You will see that a variety of icons appear; the one which we need is the grey rectangle in the top left of the set. Next select a cell in the spreadsheet where this button will appear.

Figure 10.5: Adding Buttons to the spreadsheet
Once you have done this the Assign Macro window will appear. Here you select the name of the macro which you wish to associate with the button. From now on, clicking on the button will run the associated macro.
Buttons are very useful, but their default appearance and label is not
very informative. To change the text that is displayed in the button
right-click on it and select the Edit Text option.
Many other properties of the button can be changed by right-clicking on
it and selecting the Format Control option. This will bring up the
Format Control window show in Figure 10.6. Here you can
change the size of the box, the colour, alignment and font of the
text, and various other properties.
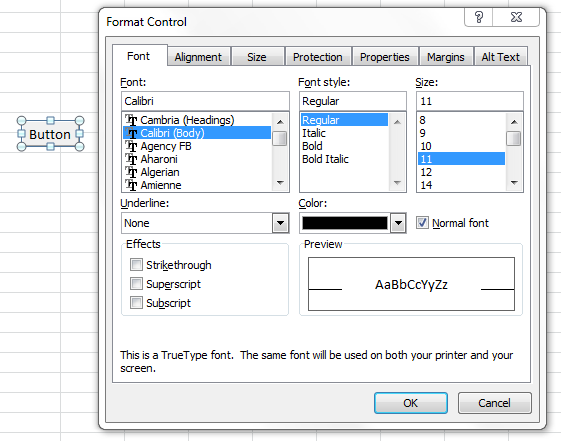
Figure 10.6: The Button Format Control window
Macros can also be assigned to other clickable objects, such as pictures which have already been imported into the spreadsheet.
10.2 Recording a Macro
To record a macro select Record Macro from either the Developer or
View tab. This will bring up the Record Macro window shown in Figure
10.7. Here you can give your macro a name and
associate a shortcut key (if desired). It is a good idea to enter a
short description of what operations you intend to carry out, so that
you (or another user) know what your macro is actually for.
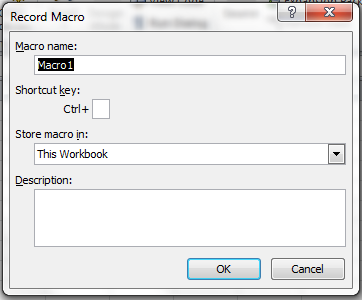
Figure 10.7: The Record Macro dialogue window
Once you close this window the macro will start recording, and any
actions which you carry out Excel will become part of the macro. Once
you have completed the desired actions you can stop recording by
pressing Stop Recording (which has now appeared in the Developer tab;
see Figure 10.8). Alternatively, if you have added the
Record Macro icon to the quick access toolbar, then this icon will be
replaced while recording by a (square) stop button.

Figure 10.8: The Macro commands in the Developer tab while recording
The easiest way to understand the record macro procedure is to do an
example. Suppose that we want to record a macro which sums the entries
in A1 to A30, and displays the answer. In the record macro window we
enter a name (such as SumA1toA30) and a brief description (such as Sum
A1 to A30 and display the answer).
Now the macro starts recording and we click on cell C3 and enter “The sum of the cells A1:A30 is”. Next we click on cell C4 and enter =SUM( and use the mouse to select the range A1:A30. Finally we enter ) to close the sum and stop the recording.
The code obtained from this procedure is
Sub SumA1toA30()
'
' SumA1toA30 Macro
' Sum A1 to A30 and display the answer
'

'
    Range("C3").Select
    ActiveCell.FormulaR1C1 = "The sum of the cells A1:A30 is"
    Range("C4").Select
    ActiveCell.FormulaR1C1 = "=SUM(R[-3]C[-2]:R[26]C[-2])"
    Range("C5").Select
End Sub
We can see this by selecting the View Macro icon and choosing the Edit option.
Note the following features:
- The macro name and description appear in the code as a commented section. This provides us with a reminder when we view the code of what exactly we have done.
- The code produces various commands which we have not seen before, such as ActiveCell.FormulaR1C1 and Range.Select. This is one of the nicest features of recording macros: we find new commands and can then go away and learn about them.
- The code produced is not necessarily as simple as what we might create ourselves. In this example there are shorter codes that would work. Indeed, when recording a macro you will frequently find that there are large parts of the code that do things that do not really matter to you (particularly if you have done things such as click on other cells without using them).
- If you do this example yourself then different code may appear.
The example has generated two features that are worthy of special
comment. In the SUM formula we do not see the expected range (A1:A30)
but instead the rather different R[-3]C[-2]:R[26]C[-2].
This is because VBA has used a different method of referring to cells,
called the R1C1 method. This works by
identifying a cell by its
relative position to the cell where we start. In the example we start
in cell C4 and want the range A1:A30. The cell A1 is 3 rows above and
2 columns before the cell C4, which corresponds to R[-3]C[-2]. (You will
probably have guessed that R stands for row and C for column.)
Similarly cell A30 is 26 rows below and 2 columns before cell C4,
which corresponds to R[26]C[-2].
This method of referring to cells relative to the position of another cell is a very useful one, and you can use it if you wish to write your own code. However, due to the constraints of time, we will not consider this method further in this module.
The second noteworthy feature is that we now have several more
examples of VBA commands of the form FirstWord.SecondWord. For
example, we have seen Application.Vlookup,
Range.Value, Range.Select, and ActiveCell.FormulaR1C1. The format of
these commands reflects the underlying object oriented
philosophy behind VBA. The basic idea is that we have objects (such as
Ranges or ActiveCells) and these objects then have properties (such as
their value).
Object oriented programming provides some powerful structures for controlling large or complicated programs, but can be rather confusing at first. We will discuss this concept in more detail later in the module.
Quite often you will want to record a macro that works with cell positions that vary. For example, you may want to record a macro that takes the current active cell and formats it, or adds it to its neighbour. If you record a macro then by default it will implement absolute referencing: the cells that you modify will never change when you run the macro.
One of the macro icons in the Developer tab (see Figure
10.1) is labelled Use Relative References. This can be
used to make your macro vary depending on the current active
cell. Clicking on this icon will highlight it, and while it is
highlighted your macro will record using relative
referencing. You must now click on a cell before starting to
record. Then everything that you do will be recorded relative to that
starting position, and if you run the macro from a different cell it
will change which cells are affected.
For example, if we click on C3 and then start recording the A1:A30
macro from before (with the Use Relative References icon highlighted)
then the macro will sum the column of 30 cells starting 2 rows above
and 2 columns before the active cell. The code generated is
Sub RelativeSum30cells()
'
' RelativeSum30cells Macro
' Sums the 30 cells starting 2 rows before and 2 columns above the printed text
'

'
    ActiveCell.Select
    ActiveCell.FormulaR1C1 = "The sum of the cells to the left is"
    ActiveCell.Offset(1,0).Range("A1").Select
    ActiveCell.FormulaR1Ca = "=SUM(R[-3]C[-2]:R[26]C[-2])"
    ActiveCell.Offset(1,0).Range("A1").Select
End Sub